
Uploading a Contact List to an Email Campaign
Uploading a contact list as a CSV file is an easy way to enroll or suppress contacts from a campaign if you do not have a connector setup to another data source such as an AMS or email marketing platform.
There are a few ways to upload a contact list to PropFuel:
Option 1: Create a segment and upload your list there (Recommended) This is a great option as it allows you to then reuse the segment (uploaded list) throughout other campaigns. You can also use the segment as a suppression list.
Option 2: Upload directly to a campaign This is a great option if you just want to upload a list and use it one time for a particular campaign to enroll the contacts.
Option 3: Upload to your contacts You also have the option to simply upload a list to your contacts to use to either just add to PropFuel, add to a campaign, or remove from a campaign.
This article covers all methods so you can choose what works best for your needs.
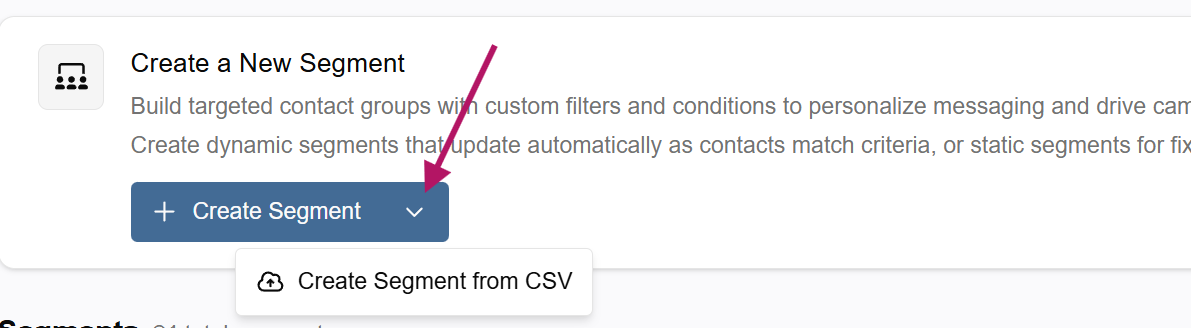
Option 1: Create a Segment and Upload Your List (Recommended)
Within segments, click the dropdown to create a segment from a CSV:
Choose your CSV file
Confirm the file to upload
Map your PropFuel fields to your CSV columns (see Understanding CSV Field Mapping below)
Review the mapping and make sure that the right columns match up to your fields
If all looks good, select to import the file. You can rename or add a description to the segment
From here, you can add the segment to your campaign either as an included segment or as a suppression segment using these steps.
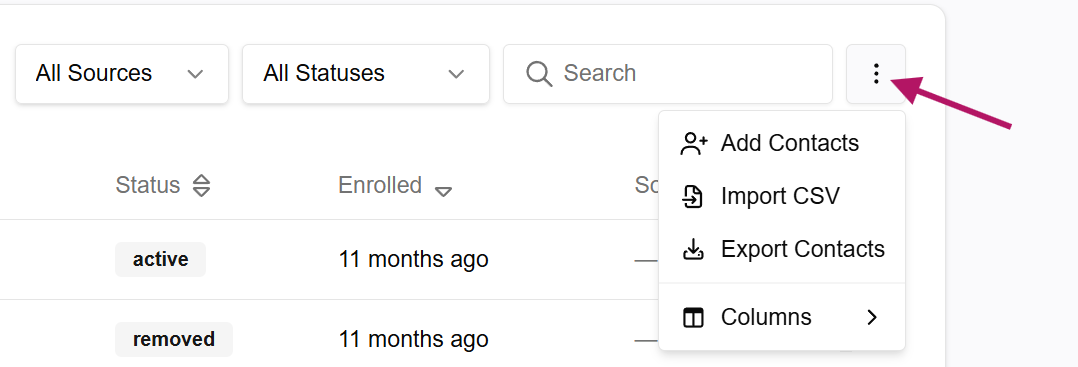
Option 2: Upload a CSV Directly to a Campaign
Within your campaign, go to the Contacts tab:
Scroll down to Enrolled Contacts and click the 3 dots, then select to import a CSV file and choose your file
Follow the same steps as above to match your columns to your PropFuel fields (see Understanding Field Mapping below), review, then import and enroll the file. This will enroll these contacts directly into your campaign
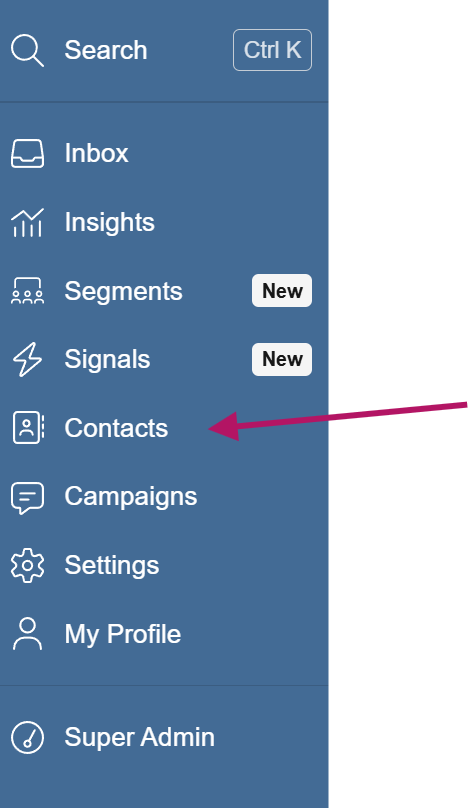
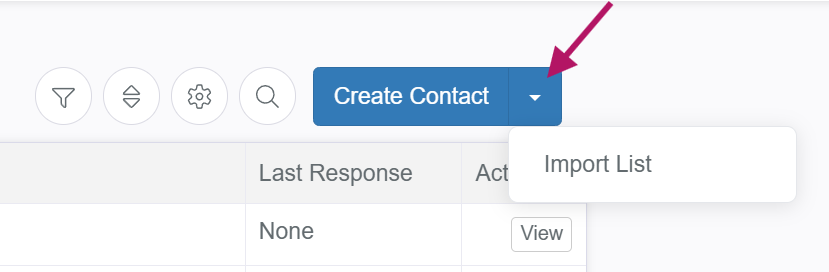
Option 3: Upload to Your Contacts via the Contact Directory
First, go to the contact directory in PropFuel:
Within the contacts area, click the arrow down next to "Create Contact" and select Import List
Follow the steps similar to above by choosing your file, mapping the columns to your PropFuel fields (see Understanding Field Mapping below), and review
The main difference in uploading at the contacts level is you have the option to:
Just add the contacts to PropFuel (great if you want to ensure certain fields are updated for a contact that aren't mapped from a third party connection)
Add to an existing campaign
Remove from a campaign
Note: If contacts are enrolled through a segment and you select to add them or remove them from a campaign this way, they could be re-enrolled.
What You'll Need for Your CSV
File type: .csv (comma-separated values) only. Excel or text lists must be saved/exported as CSV before upload.
Must-have:
An email address column (without this, PropFuel won't know who to email)
A header row (for example: email,first_name,tag,enrolled_date)
Make sure each contact goes on its own row
Common columns to include:
email (required)
full_name or first_name (optional)
Custom fields you've already created in PropFuel (e.g., expiration_date) (optional)
tag (optional)
enrolled_date (optional for controlling when a contact joins a sequence)
Understanding Field Mapping
When uploading any CSV file (whether to a segment, campaign, or contacts), you'll need to map your CSV columns to PropFuel fields. Here's what you need to know:
System fields (required): Map your email column to Email. You can also map name fields if you have them.
Custom fields: Match any CSV columns to custom fields you've already created. These can be used as tokens in your emails (like "Dear First Name").
Metadata:
Tags: If your CSV has a tag column, map it to automatically apply those tags.
Enrollment Date: Use this to place people at the right spot in a campaign sequence (for example, skipping the first check-in if they're already past that point).
Double-Check Your Results
After processing, PropFuel will give you a summary:
Total contacts added
Any duplicates found
Any errors (like an invalid email format)
You can also open a contact's record to see tags and field values applied.
Tips & Troubleshooting
Upload not working? Make sure your file is saved as a CSV.
Can't find a field to map? Create the custom field first under Settings → Custom Fields, then re-upload.
Tokens not working (like "Dear First Name" showing up blank)? Check that you mapped the CSV column to the right PropFuel field.
Need to skip steps in a sequence? Use the Enrollment Date column.
Invalid emails? Fix them in your CSV and re-upload.
If at any moment you need any assistance, please don't hesitate to reach out to us at support@propfuel.com!