
How to Create and Edit Action Workflows on Email Campaigns
A workflow action is what happens automatically once someone answers your check-in question. Think of it this way: if someone answers your question — in this case, "Are you interested in joining us?" — what happens next? The workflow is your automated response.
To access workflows for a check-in, click the right-hand workflow arrow within the check-in box. This is where you'll build, edit, and manage all of your automated responses for that question.
Creating a New Workflow
Open your campaign and navigate to the check-in you want to add a workflow to.
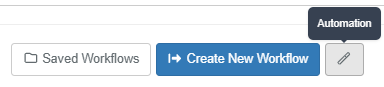
Click the right-hand workflow arrow on the check-in box.
Click the blue "Create New Workflow" button.
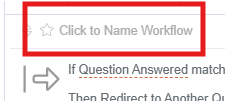
This creates a new if/then trigger: if someone answers the question a certain way, then these actions happen automatically.
You can also click the magic want, and it'll automatically create one workflow for each answer option your question has:
Setting Up Triggers for Multiple Choice Questions
For multiple choice questions, your trigger will typically be "Question Answered" → "Selection Equals" followed by one of your response options. You can also use "Selection Does Not Equal" to target everyone who didn't choose a specific answer.
One workflow per response option. When you add conditions within the same workflow, they act as an "AND" — meaning the contact would have to select both options simultaneously, which isn't possible on a single-select question. Instead, create a separate workflow for each response option you want to handle.
The one exception is "Does Not Equal." For example, if you want a workflow that fires for everyone except those who answered "Yes," you can set the trigger to "Selection Does Not Equal: Yes." If you have a larger number of response options and want to exclude more than one, you can stack "Does Not Equal" conditions (e.g., Does Not Equal "Yes" AND Does Not Equal "Possibly") to narrow it down.
Setting Up Triggers for Open-Ended Questions
For open-ended questions, your trigger options work a little differently since there are no predefined answer choices. The most common options are:
Text Response → Filled: This fires whenever the contact types any response at all — regardless of length or content. This is the most commonly used trigger for open-ended questions.
Text Response → Contains: This fires when the response includes a specific keyword or phrase. For example, if the response contains the word "retired," you might route them to a different follow-up than someone whose response contains the word "cost." This is useful for routing responses based on key themes.
Text Response → Equals / Does Not Equal: This requires an exact match to the text you specify. Because people phrase things differently and typos are common, exact match triggers are rarely practical for open-ended questions. Use "Contains" or "Filled" instead in most cases.

Choosing Workflow Actions
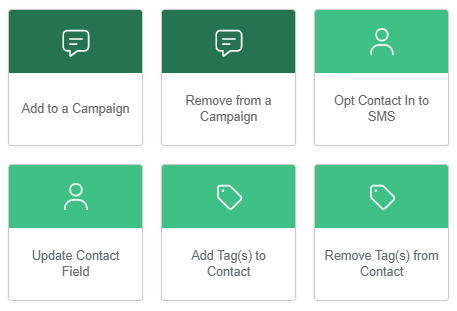
Once your trigger is set, you choose what happens when a contact matches it. There are many workflow actions available, and you can mix and match multiple actions within the same workflow. Some common actions include:
Add to a campaign
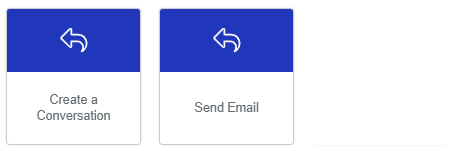
Send an email
Send an internal alert
Show text on a landing page
Redirect to a URL
Redirect to another question
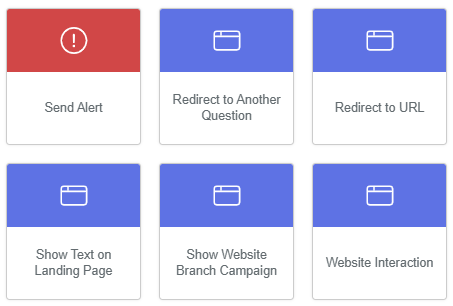
The purple row — pick only one. The actions in the purple row (Show Text on Landing Page, Redirect to URL, and Redirect to Another Question) all control what appears in the contact's browser after they respond. Since only one thing can load in that browser tab, you can only choose one action from the purple row per workflow. You're free to combine it with any other (non-purple) actions.
Teal buttons are connector-based. Any actions shown in teal are powered by your connected integrations (Salesforce, Fonteva, iMIS, etc.). These are your write-back actions — they push data back to your AMS. If you're not seeing the write-back actions you'd expect, check your connectors under Advanced Settings → Connectors to make sure everything is set up and configured.
Saving and Reusing Workflows
If you want to reuse a workflow across multiple check-ins or campaigns, PropFuel makes that easy with Saved Workflows.
After building your workflow, give it a descriptive name.
Click Save, then click the Star icon to mark it as a favorite:
Now, when you go to create a workflow on any other check-in, click "Saved Workflows" to access your starred workflows:

When you open Saved Workflows from within a check-in, PropFuel will show you two things: workflows that are already part of that specific check-in question, and your starred workflows that you can pull in from anywhere.
Quick copy tip: If you just need to duplicate a landing page text across workflows within the same check-in, you can simply copy and paste the landing page content. Saved Workflows are most helpful when you want to reuse an entire workflow configuration across different check-ins or campaigns.
Turning Workflows On
This is a critical step that's easy to miss. After building your workflows, you must toggle them on before they will fire — both in testing and in live sends.
To turn a workflow on, click the toggle located to the right of the workflow name:

If a workflow is off, none of its actions will execute. Instead, the contact will just see whatever is on your default Thank You Page template.
Always turn workflows on before testing and before launching your campaign.
Testing Workflows
When you send yourself a test email and respond to the check-in, your workflows will fire just like they would for a real contact — as long as they're toggled on. This means:
Landing page text will display.
Emails and internal alerts will send.
Write-back actions will execute in test mode. If you have a connector-based action that writes data back to your AMS (for example, updating a job title), and you respond to the test email with an updated value, it will actually write back to your system. This is by design so you can verify the connection is working.
If you test a write-back action and don't see the data updating in your AMS, go back to the workflow action and double-check that you've configured the field and response mapping correctly.
Important Things to Know
Create one workflow per response option for multiple choice questions. Don't stack response options within the same workflow — the "AND" logic means both would have to be selected simultaneously.
Only one purple action per workflow. Show Text on Landing Page, Redirect to URL, and Redirect to Another Question all control the browser tab, so you can only pick one.
Teal actions depend on your connectors. If you're missing expected write-back actions, verify your integrations under Advanced Settings → Connectors.
Workflows must be toggled on to work — in both testing and live sends.
Write-backs fire in test mode. Be aware that AMS write-back actions will execute when you test, so use caution with sensitive fields.
Workflows can be edited after sending. You can update workflow actions even after a check-in has been sent to contacts.
If you have questions about setting up workflows or need help configuring write-back actions, reach out to us at support@propfuel.com!