
Analysis and Reporting in PropFuel
Campaign Reporting:
Understanding how your campaigns perform is key to improving engagement and maximizing conversions. This guide provides an overview of Campaign Reporting in PropFuel, including how to analyze campaign data, export results, and create lists to track success. By leveraging these reporting tools, you can gain deeper insights into engagement trends and determine the best next steps for your campaigns.
Insights Dashboard:
The Insights Dashboard is your central hub for understanding member engagement across all your PropFuel campaigns. Track performance metrics, analyze trends, and dig into the details of how your audience interacts with your communications across email, web, and SMS channels. Learn more about how to read the insights dashboard here.
Campaign History:
The Campaign History feature offers a comprehensive view of your campaign’s performance, allowing you to analyze engagement, response rates, and specific responses. These insights help you better understand member interactions and optimize future campaigns.
Dashboard Summary:
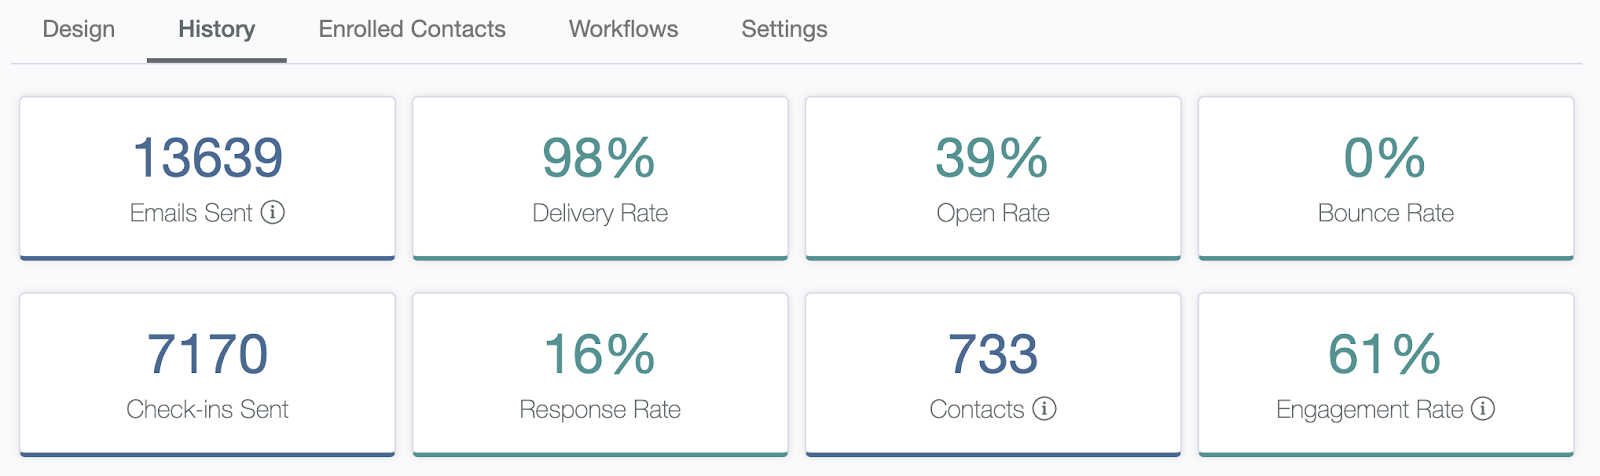
At the top of the Campaign History page, you'll find a dashboard with key metrics:
Emails Sent: The total number of initial check-in emails AND reminders sent. (Reminders are only sent to individuals who don’t answer a check-in.)
Delivery Rate: The percentage of emails successfully delivered.
Open Rate: The percentage of delivered emails that were opened.
(Note: PropFuel prioritizes response and engagement rates over open rates, as email providers often open emails automatically to remove tracking pixels.)Bounce Rate: The percentage of emails that bounced.
Check-ins Sent: The total number of initial check-in emails sent.
Response Rate: The average response rate across all check-ins in the campaign.
Contacts: The number of contacts enrolled in the campaign.
Engagement Rate: The percentage of contacts who answered at least one question.
Check-In Level Data:
Each check-in within the campaign has its own set of data.
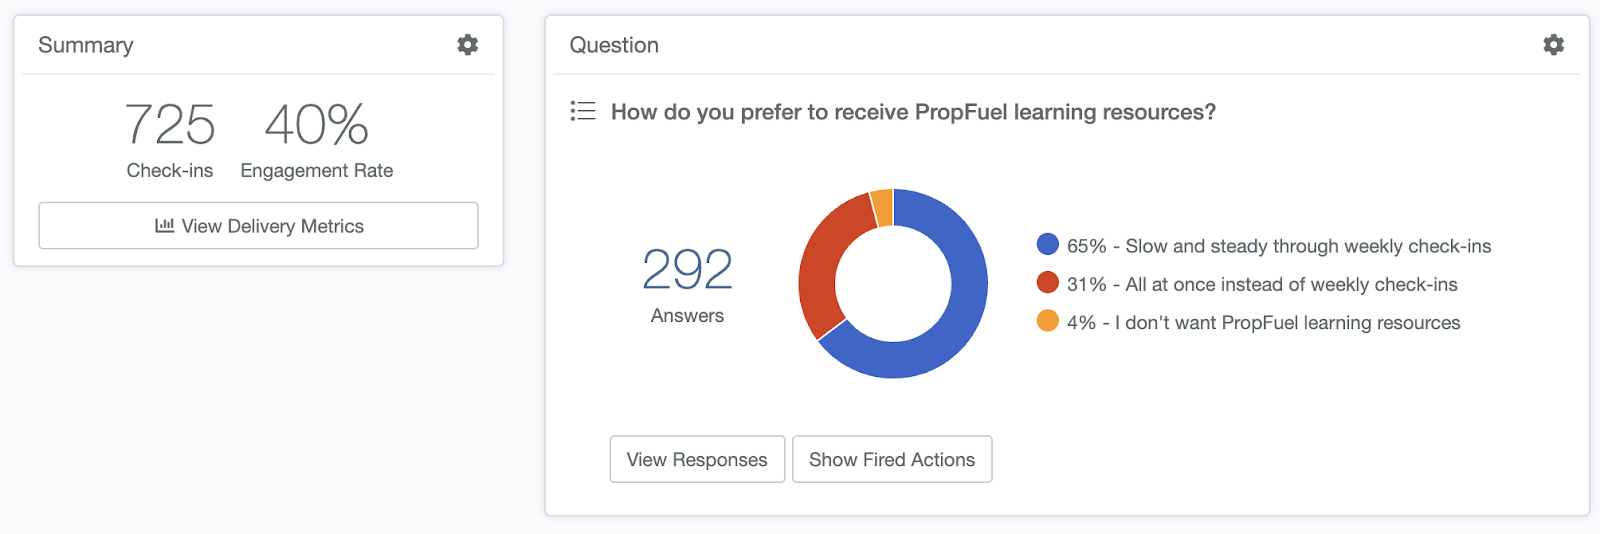
Summary Box (Left Side):
Check-ins Sent: The total number of check-ins sent for this specific question.
Engagement Rate: The percentage of contacts who engaged with this check-in.
Within Delivery Metrics:
View delivered, opened, and bounced email metrics for both the initial check-in and reminders (if applicable).
Download bounced emails as a CSV file under the Bounces tab.
Check-in Settings (gear icon):
Print Responses: Print all responses for this check-in.
Download CSV file: Export responses as a CSV file.
Show email template: View the original email template for the check-in.
Show thank you template: View the original thank-you page template for the check-in.
Send test email: Send yourself a test version of the check-in email.
Question Box (Right Side):
Question: Displays the question, the total number of responses, and a visual representation of responses (pie charts, bar graphs, etc., based on question type).
View Responses: See individual responses, apply filters, and export data. You can also respond directly to individual answers here.
Show Fired Actions: Displays any actions triggered by responses (e.g., emails sent, redirects, text displayed on a landing page).
Question settings (gear icon):
View/Edit Workflows: View or edit the workflows for this check-in. You have the ability to edit workflows even after the check-in has been sent.
Reminders: Adjust reminder settings for this check-in. You have the ability to adjust the reminders event after the initial check-in has been sent.
Export Options:

Data can be exported at both the campaign level and the response level in two formats:
PDF Export: A formatted report for review and sharing.
CSV Export: A spreadsheet-compatible file for deeper analysis.
PropFuel now offers AI-powered summaries of your campaign data! Click the Summarize button (wand icon) to generate a concise summary in short or long format.
Taking Action on Your Data
Beyond viewing campaign metrics, PropFuel helps you turn insights into action. Use Conversion Segments to measure success and Signals to identify members who need follow-up.
Conversion Segments
A Conversion segment is a dynamic group of contacts who have completed a specific action based on campaign engagement. These segments update automatically, making it easy to measure success over time.
Example: Contacts who were in the campaign and have renewed.
Learn how to build a conversion segment here: Conversion Segments
Using Signals to Identify Contacts Who Need Follow-Up
Signals automatically surface contacts who need follow-up based on their engagement (or lack thereof) with a campaign. Instead of manually building filters to catch these patterns, Membership AI detects them for you and recommends which behaviors are worth tracking.
Example: Contacts who said "yes" to renewing but have not yet completed the process.
How Signals Work for Follow-Up
Signals track patterns of behavior and intent in real time. When a contact's response indicates they need attention, the Signal captures that match automatically. You can then use that Signal to build a Segment for outreach.
Common Follow-Up Signal Types:
Option Selection: Contact selected a specific answer that indicates intent or need (e.g., "Yes, I'm interested in renewing" or "I need help with X")
Unanswered Check-In: A check-in was sent but not answered after a set number of days
Rating Selection: Contact's rating meets a threshold that suggests they need follow-up (e.g., satisfaction rating of 2 or below)
Multiple Responses: Contact answered multiple questions in a way that suggests a pattern (e.g., engaged early but dropped off later)
Use this article to learn how to build a signal then turn it into a segment: Signals Overview
Membership AI Tab
The Membership AI tab lives inside each campaign and helps you discover which member behaviors are worth tracking.
Campaign Context
Membership AI automatically generates a description and goal for your campaign based on how it's set up. You can edit both fields to improve accuracy. The richer this context is, the better the AI's Signal recommendations will be.
Tracked Signals
View all Signals currently active for this campaign. Click any Signal name to see match counts, trends, and related segments.
AI Suggested Signals to Track
Based on your campaign's goal and questions, Membership AI recommends behaviors worth tracking. Each suggestion shows:
Priority level: How closely the Signal aligns with your campaign goal (High, Medium, Low)
Type: The behavior being detected (Option Selection, Unanswered Check-in, Rating Selection, etc.)
Threshold: The specific criteria that trigger a match
Click Start Tracking to activate a Signal. You can customize its name, description, and criteria before finalizing.